I just started restoring my mostly rusty 914/4, 73. I’m looking for parts and a donor car but want to start. Plan is complete tear down and then repair, replace and reassemble. Likely years beginning to end. I took all weather stripping off, carpet and seats out to clean and inspect but need advice in organizing.
For the more experienced what works? Do you start in one area, take everything off, clean, record, label and store away based on section of car? All left door bits go in ‘left door’ tote with each part labeled.
Do you track parts working condition or is that more assembly section.
I’ve worked on cars before but never to this level of tear down.
I’ve searched and got more lost.
Full Version: General process for restoration 914
QUOTE(Stuckon914 @ Jan 18 2020, 01:37 PM) 
I just started restoring my mostly rusty 914/4, 73. I’m looking for parts and a donor car but want to start. Plan is complete tear down and then repair, replace and reassemble. Likely years beginning to end. I took all weather stripping off, carpet and seats out to clean and inspect but need advice in organizing.
For the more experienced what works? Do you start in one area, take everything off, clean, record, label and store away based on section of car? All left door bits go in ‘left door’ tote with each part labeled.
Do you track parts working condition or is that more assembly section.
I’ve worked on cars before but never to this level of tear down.
I’ve searched and got more lost.
The short answer: Label everything. Draw little pictures or where it came from if need be. Later at reassembly you can lean on the Hayes and/or factory manual for exploded views and reassembly information. If you can't find the disassembled parts, and they aren't labeled, you're screwed!
I find quart size and gallon size Ziploc freezer bags and a Sharpie to be indispensible. Buy in bulk at Cosco.
I used masking tape to hold screws to parts and label stuff. By the time I got to the point of assembly, the tape had flaked apart. Use good tape or work faster than I did
+1 on ziplocks and sharpie labels. Also, take lots of reference pics and tag or organize them so you can easily find them later. No matter how many you take, you will wish you had more.
Where my system failed was in the tote department. I used pretty big totes and tried to separate parts roughly by the categories in the parts catalog (e.g. body, interior, engine, etc.) but adjusted to what would fit in totes. For example, I wound up consolidating front/rear trunk and engine bay. Like I said, the system failed and I have wasted a lot of time trying to figure out which f-ing tote/category I put a part in. Smaller totes and more precise categories might have helped but I'm kind of an organizational disaster no matter what.
I did not clean and catalog condition up front. Instead, I would pull a tote out and work on it in the evenings while watching TV, evaluating, cleaning, ordering replacement parts and reassembling. That worked well for me as it kept me making progress even when I didn't have time to complete major tasks. It is paying huge dividends now that I'm in reassembly mode because most of the parts are already refurbished and it just a matter of bolting them in.
QUOTE(bbrock @ Jan 18 2020, 01:59 PM)
+1 on ziplocks and sharpie labels. Also, take lots of reference pics and tag or organize them so you can easily find them later. No matter how many you take, you will wish you had more.
Where my system failed was in the tote department. I used pretty big totes and tried to separate parts roughly by the categories in the parts catalog (e.g. body, interior, engine, etc.) but adjusted to what would fit in totes. For example, I wound up consolidating front/rear trunk and engine bay. Like I said, the system failed and I have wasted a lot of time trying to figure out which f-ing tote/category I put a part in. Smaller totes and more precise categories might have helped but I'm kind of an organizational disaster no matter what.
I did not clean and catalog condition up front. Instead, I would pull a tote out and work on it in the evenings while watching TV, evaluating, cleaning, ordering replacement parts and reassembling. That worked well for me as it kept me making progress even when I didn't have time to complete major tasks. It is paying huge dividends now that I'm in reassembly mode because most of the parts are already refurbished and it just a matter of bolting them in.
Heading back to home depot to return my 8 huge Rubbermaid totes. I’ll pick up more of the smaller Tupperware style and box of ziplock bags.
I’ll print out parts diagrams and circle what I have and leave in the bag.
Sharpies seem to always wipe off for me. Maybe they have some that are less prone to that.
I should find my old Nikon digital camera in the garage.
Any other suggestions, specially for smaller bits like screws.
QUOTE(bbrock @ Jan 18 2020, 01:59 PM)
Instead, I would pull a tote out and work on it in the evenings while watching TV, evaluating, cleaning, ordering replacement parts and reassembling.
Hmmmm...good I idea, but, I'm not sure how the wife will hear the TV over the die grinder.

QUOTE(Stuckon914 @ Jan 18 2020, 04:33 PM)
Sharpies seem to always wipe off for me. Maybe they have some that are less prone to that.
Ziplock freezer bags have a nice white area on them designed for labeling. No issues with wiping off or smearing which I have sometimes seen on just the clear bags.
QUOTE(Superhawk996 @ Jan 18 2020, 04:34 PM)
QUOTE(bbrock @ Jan 18 2020, 01:59 PM)
Instead, I would pull a tote out and work on it in the evenings while watching TV, evaluating, cleaning, ordering replacement parts and reassembling.
Hmmmm...good I idea, but, I'm not sure how the wife will hear the TV over the die grinder.
PB plaster and WD-40 aromas through out the House, probably the last straw
I agree with above but they forgot :
buy car, take apart, find rust, spend money, find rust, buy tools, find rust, spend money, find rust, spend money, find rust, buy more tools, find more rust.....
You get the idea.
buy car, take apart, find rust, spend money, find rust, buy tools, find rust, spend money, find rust, spend money, find rust, buy more tools, find more rust.....
You get the idea.
QUOTE(Stuckon914 @ Jan 18 2020, 10:37 AM)
I just started restoring my mostly rusty 914/4...
Unless you are already attached to the car for some reason, you might want to keep looking for a car to restore and use yours as the parts car. If it really is mostly rusty, and unless you are very good with a MIG welder, you will spend a fortune getting all the rust repaired.
If at all possible find one with little or no rust. All the mechanical pieces are available and relatively inexpensive. All interior soft items are reproduced. Taking out dents and dings isn't that tough. Rust repair is a bitch.
Transport of a car from the West or South is a few grand, but you'll be thousands of dollars and months (years?) ahead if you start with one that isn't "mostly rusty".
QUOTE(DickSteinkamp @ Jan 18 2020, 05:14 PM)
QUOTE(Stuckon914 @ Jan 18 2020, 10:37 AM)
I just started restoring my mostly rusty 914/4...
Unless you are already attached to the car for some reason, you might want to keep looking for a car to restore and use yours as the parts car. If it really is mostly rusty, and unless you are very good with a MIG welder, you will spend a fortune getting all the rust repaired.
If at all possible find one with little or no rust. All the mechanical pieces are available and relatively inexpensive. All interior soft items are reproduced. Taking out dents and dings isn't that tough. Rust repair is a bitch.
Transport of a car from the West or South is a few grand, but you'll be thousands of dollars and months (years?) ahead if you start with one that isn't "mostly rusty".

Totally, I always tell my customers to buy the best car they can afford, even if you have to take out a loan.
It will cost less in the long haul and you can enjoy it right away.
QUOTE(Stuckon914 @ Jan 18 2020, 02:57 PM)
QUOTE(Superhawk996 @ Jan 18 2020, 04:34 PM)
QUOTE(bbrock @ Jan 18 2020, 01:59 PM)
Instead, I would pull a tote out and work on it in the evenings while watching TV, evaluating, cleaning, ordering replacement parts and reassembling.
Hmmmm...good I idea, but, I'm not sure how the wife will hear the TV over the die grinder.
PB plaster and WD-40 aromas through out the House, probably the last straw
 Ha ha. You guys are real jokers
  Yes, there are limits. +1 on the freezer bags with the white label patches. Never had problems with sharpie rubbing off on those.
Small hardware bits are probably the biggest challenge. Small parts organizers are a must. You can buy really cheap ones at HF. They are not good quality (latches don't work) but good for temporary use. I used a combo of HF and better quality organizers figuring the HF ones likely get tossed by the end of the project. I did a combination of things to organize which also causes problems. Like PanelBilly I taped some hardware to the parts they went with although I used blue painter's tape which worked well. I also put hardware in ziplock bags labeled with the part they went to. I wouldn't do either of those again. The problem is you end up with hardware scattered here and there and you wind up losing track. I bought a lot of hardware bits only to discover later I already had them. The extra cost was only a rounding error on the whole project but still...
I found just having hardware well-sorted in organizers was much better. The PET will tell you the correct hardware for 95% of the parts on the car. That way, you know you are putting it back together right. You can't trust what POs have done.
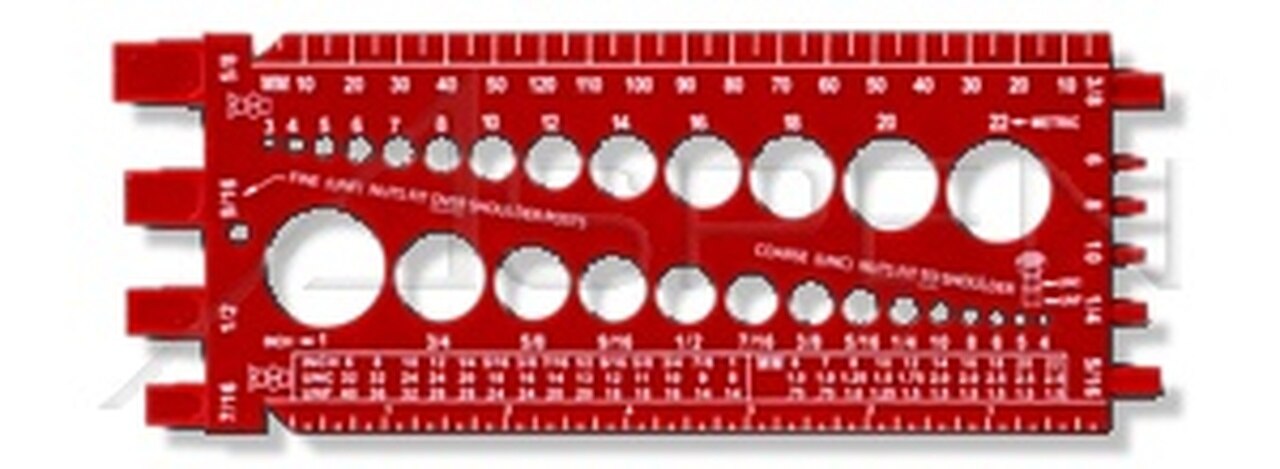
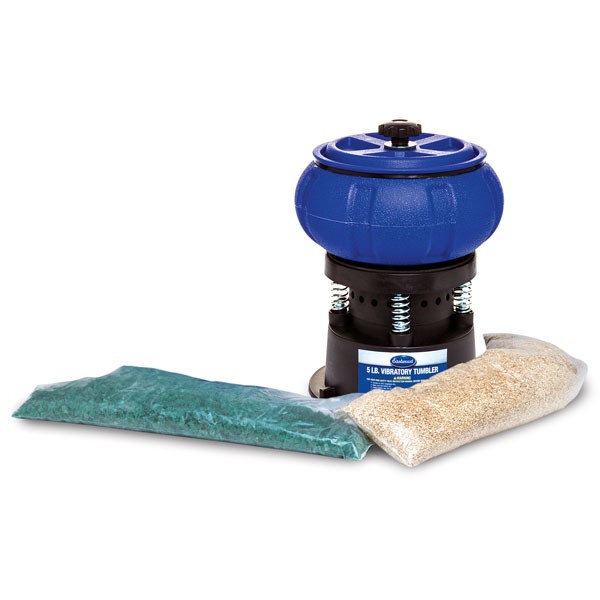
Here's how I would tackle it if I ever did this again: Remove all the hardware and toss everything that will need replated into one bucket. If you are going to replate hardware yourself, you can keep the parts organized and sorted but if you are sending them off, it's all going to get mixed up anyway. Measure and sort the hardware that won't get plated into the little organizers by size rather than where they go. One of the best tips I got on this forum was to get myself one of these:
Do the same with the hardware that comes back from the plater. Then it is pretty easy during assembly to reference the PET (the factory manual is also a great reference for this) and select the correct hardware from your organizers. Way easier than trying to keep track of which screws came out of what part.
And like Mark said, you will be buying a lot of tools!
QUOTE(DickSteinkamp @ Jan 18 2020, 03:14 PM)
QUOTE(Stuckon914 @ Jan 18 2020, 10:37 AM)
I just started restoring my mostly rusty 914/4...
Unless you are already attached to the car for some reason, you might want to keep looking for a car to restore and use yours as the parts car. If it really is mostly rusty, and unless you are very good with a MIG welder, you will spend a fortune getting all the rust repaired.
If at all possible find one with little or no rust. All the mechanical pieces are available and relatively inexpensive. All interior soft items are reproduced. Taking out dents and dings isn't that tough. Rust repair is a bitch.
Transport of a car from the West or South is a few grand, but you'll be thousands of dollars and months (years?) ahead if you start with one that isn't "mostly rusty".
Boo!
 Where is the fun in that?

Okay, that's the smart path to having a car you can drive, but some of us masochists actually enjoy the challenge of resurrecting a basket case. If you can do it full on DIY, it isn't as expensive to do as many let on. It isn't cheap though.
keep all of the original parts and label very thoroughly
things like
"left door panel hardware"
right rocker panel hardware
right door latch and screws
label the switches with the wire color numbers that plug into them
the more labeled baggies the better, then put those labeled baggies in a box, for example labeled "door hardware". Or "dashh switches"
Put any hardware you can screwed into its original piece, make drawings about how something came apart if difficult
ri
I just started restoring my mostly rusty 914/4, 73. I’m looking for parts and a donor car but want to start. Plan is complete tear down and then repair, replace and reassemble. Likely years beginning to end. I took all weather stripping off, carpet and seats out to clean and inspect but need advice in organizing.
For the more experienced what works? Do you start in one area, take everything off, clean, record, label and store away based on section of car? All left door bits go in ‘left door’ tote with each part labeled.
Do you track parts working condition or is that more assembly section.
I’ve worked on cars before but never to this level of tear down.
I’ve searched and got more lost.
things like
"left door panel hardware"
right rocker panel hardware
right door latch and screws
label the switches with the wire color numbers that plug into them
the more labeled baggies the better, then put those labeled baggies in a box, for example labeled "door hardware". Or "dashh switches"
Put any hardware you can screwed into its original piece, make drawings about how something came apart if difficult
ri
QUOTE(Stuckon914 @ Jan 18 2020, 11:37 AM)
I just started restoring my mostly rusty 914/4, 73. I’m looking for parts and a donor car but want to start. Plan is complete tear down and then repair, replace and reassemble. Likely years beginning to end. I took all weather stripping off, carpet and seats out to clean and inspect but need advice in organizing.
For the more experienced what works? Do you start in one area, take everything off, clean, record, label and store away based on section of car? All left door bits go in ‘left door’ tote with each part labeled.
Do you track parts working condition or is that more assembly section.
I’ve worked on cars before but never to this level of tear down.
I’ve searched and got more lost.
QUOTE(bbrock @ Jan 18 2020, 05:37 PM)
. . . . some of us masochists actually enjoy the challenge of resurrecting a basket case. If you can do it full on DIY, it isn't as expensive to do as many let on. It isn't cheap though.
I love saving cars and motorcycles that were otherwise headed for scrap. If it's already a basket case, and you don't like how it turns out, you can still always move parts over to another tub. In the mean time you'll pick up valuable skills that will carry you though a lifetime.
Just be conscious of how much time and money you're willing to put into it. The line between hobby and insanity get's blurry real fast.
QUOTE(bbrock @ Jan 18 2020, 04:37 PM)
but some of us masochists actually enjoy the challenge of resurrecting a basket case. If you can do it full on DIY, it isn't as expensive to do as many let on. It isn't cheap though.
mine was a complete restoration/ restomod and it took just over 4 years to get it running and road legal. there's still things to do but at least it runs
Decide on how much you can really handle your going to need to know this before you get into it. 4-5 years is not uncommon.
Over the years I have bought several peoples projects. The worst was a CJ-5 that they took apart, bought tons of parts, a fiberglass body, did not document crap. Took 3 years. I got it when I was 12, had it done the summer of my 15th year of existence, drove it around the yard for a year, and then got my license. Fired it up, drove it 30 feet on the road, turned around and never drove it again. Next day I went and picked up a Karmann Ghia. Anther project, I keep that one running while I did the restoration on the weekends and over the summer.
Best one, was a Z that the original owner a German machinist picked up to put a Ferrari GTO Kit on. He documented everything, had it cataloged, cleaned and bagged. I got the binder with every part listed what tub it was in, and pictures of every single step, also cataloged with cross references to pages in the manuals. It was the best build I had done, so easy. He just lost interest as it was taking to long. He had a 3 series BMW at that time.
My first suggestion is if you have never driven one, go take a 914 for a spin. I learned a lot from that Jeep, but never got to truly enjoy the fruits of my labor.
All good advice; parts bin goes on the list. I agree 100% the rational and pragmatic choice is a west coast solid body. I’ve had this car for 25 years in storage. My father and nephew are excited to be involved, we’ve talked about it for a long time.
I am looking for a drive ready or close to drive ready 914 that we can work on and mine can be a longer project or we become rational and make it a parts car.
I don’t think there is one person that wants a 914 would be considered rational by my spouse or even their own.
I am looking for a drive ready or close to drive ready 914 that we can work on and mine can be a longer project or we become rational and make it a parts car.
I don’t think there is one person that wants a 914 would be considered rational by my spouse or even their own.
QUOTE(bbrock @ Jan 18 2020, 01:59 PM)
+1 on ziplocks and sharpie labels. Also, take lots of reference pics and tag or organize them so you can easily find them later. No matter how many you take, you will wish you had more.
Where my system failed was in the tote department. I used pretty big totes and tried to separate parts roughly by the categories in the parts catalog (e.g. body, interior, engine, etc.) but adjusted to what would fit in totes. For example, I wound up consolidating front/rear trunk and engine bay. Like I said, the system failed and I have wasted a lot of time trying to figure out which f-ing tote/category I put a part in. Smaller totes and more precise categories might have helped but I'm kind of an organizational disaster no matter what.
I did not clean and catalog condition up front. Instead, I would pull a tote out and work on it in the evenings while watching TV, evaluating, cleaning, ordering replacement parts and reassembling. That worked well for me as it kept me making progress even when I didn't have time to complete major tasks. It is paying huge dividends now that I'm in reassembly mode because most of the parts are already refurbished and it just a matter of bolting them in.
There is all kinds of mid week evening things you can do cleaning parts between big weekend tasks. You will get more noticable progress that way. Keeps you focused and motivated too.QUOTE(Stuckon914 @ Jan 18 2020, 06:35 PM)
I’ve had this car for 25 years in storage. My father and nephew are excited to be involved, we’ve talked about it for a long time.
Good reasons to restore THAT car.

Photos, photos, photos. Camera phone or cheap digital camera that lives in the garage.
Take photos from different angles before taking things apart, and during disassembly.
Priceless for you, and entertaining for us.
Take photos from different angles before taking things apart, and during disassembly.
Priceless for you, and entertaining for us.
Like everybody else has said, take a lot of pictures as you take it apart. Zippie baggies are your friend, as are plastic totes. I even designate a shelf area and that area is tagged with the vin# and description of the vehicle. Going on my 16th year of restorations and I still do this to every single car.
Best of luck and the main thing is to have fun doing your restoration. Each and every one of them has their own unique challenge.
QUOTE(Uniquecoaches @ Jan 18 2020, 10:56 PM)
Best of luck and the main thing is to have fun doing your restoration. Each and every one of them has their own unique challenge.
Great advice.
QUOTE(Uniquecoaches @ Jan 18 2020, 10:54 PM)
Like everybody else has said, take a lot of pictures as you take it apart. Zippie baggies are your friend, as are plastic totes. I even designate a shelf area and that area is tagged with the vin# and description of the vehicle. Going on my 16th year of restorations and I still do this to every single car.
Beautiful car and nice setup.for the small parts you take off that are plastic or rubber do you treat them with anything for storage?
My garage loft area will be over 100 in the summer and single digits in the winter.
QUOTE(Stuckon914 @ Jan 19 2020, 10:39 AM)
QUOTE(Uniquecoaches @ Jan 18 2020, 10:54 PM)
Like everybody else has said, take a lot of pictures as you take it apart. Zippie baggies are your friend, as are plastic totes. I even designate a shelf area and that area is tagged with the vin# and description of the vehicle. Going on my 16th year of restorations and I still do this to every single car.
Beautiful car and nice setup.for the small parts you take off that are plastic or rubber do you treat them with anything for storage?
My garage loft area will be over 100 in the summer and single digits in the winter.
That's a prime example of the kind of thing I worked on int he evenings. Most important is to store those dry and away from sunlight. Cool is better but the sunlight is most important. Then you can pull them out in batches and clean them up. After they were nice and clean, I treated all rubber and plastic with 30 protectant.
For me, an important part of the process is finding the right balance of tasks to keep things interesting and fun. Cleaning up a huge batch of parts at the beginning of the project would have been pure drudgery for me. Doing it in small batches was much more gratifying and provided really nice breaks from the heavy metal work. The cutting, welding, grinding, and fabricating is challenging and fun but can seem never ending on a big project. It's nice to have little interludes mixed in where you refurbish a nasty instrument cluster to like new condition. In fact, after I refurbished my gauges, I put the instrument cluster in our family room as a show piece for inspiration.
The point being that these big projects are as much mental as they are physical.
QUOTE(DickSteinkamp @ Jan 18 2020, 10:33 PM)
QUOTE(Stuckon914 @ Jan 18 2020, 06:35 PM)
I’ve had this car for 25 years in storage. My father and nephew are excited to be involved, we’ve talked about it for a long time.
Good reasons to restore THAT car.
& one of my 914s' was in storage for 27 years, also in a Maryland garage. Has spent the last 13 in a Virginia garage Only way you're going to find minimum rust cars on the east coast.
QUOTE(Johny Blackstain @ Jan 19 2020, 04:09 PM)
QUOTE(DickSteinkamp @ Jan 18 2020, 10:33 PM)
QUOTE(Stuckon914 @ Jan 18 2020, 06:35 PM)
I’ve had this car for 25 years in storage. My father and nephew are excited to be involved, we’ve talked about it for a long time.
Good reasons to restore THAT car.
& one of my 914s' was in storage for 27 years, also in a Maryland garage. Has spent the last 13 in a Virginia garage Only way you're going to find minimum rust cars on the east coast.Must’ve been a vacuum sealed garage if no rust after 13 years. That is very impressive.
QUOTE(Stuckon914 @ Jan 19 2020, 04:35 PM)
Must’ve been a vacuum sealed garage if no rust after 13 years. That is very impressive.
Hardly- body was always great, still is, but 24 of those years in the Md garage seized the pistons solid... it's why my original engine block has OEM euro pistons now. Low mileage, numbers matching LE's are frowned on when modified
 Have to keep it to a minimum
QUOTE(bbrock @ Jan 19 2020, 01:04 PM)
It's nice to have little interludes mixed in . . . .
QUOTE(bbrock @ Jan 19 2020, 01:04 PM)
In fact, after I refurbished my gauges, I put the instrument cluster in our family room as a show piece for inspiration.
@bbrock
And to think I thought I was the only dork that did this. My wife banishes it to the man cave though!
QUOTE(Johny Blackstain @ Jan 19 2020, 05:00 PM)
QUOTE(Stuckon914 @ Jan 19 2020, 04:35 PM)
Must’ve been a vacuum sealed garage if no rust after 13 years. That is very impressive.
Hardly- body was always great, still is, but 24 of those years in the Md garage seized the pistons solid... it's why my original engine block has OEM euro pistons now. Low mileage, numbers matching LE's are frowned on when modified
Have to keep it to a minimum Hopefully mine aren’t seized. Will find out in a few weeks.
[quote name='Superhawk996' date='Jan 19 2020, 05:01 PM' post='2778969']
[quote name='bbrock' date='Jan 19 2020, 01:04 PM' post='2778904']
It's nice to have little interludes mixed in . . . .
[quote name='bbrock' date='Jan 19 2020, 01:04 PM' post='2778904']
In fact, after I refurbished my gauges, I put the instrument cluster in our family room as a show piece for inspiration.
[/quote]
@bbrock
And to think I thought I was the only dork that did this. My wife banishes it to the man cave though!
[/quote]
That’s got a wife upstairs vibe all over it. I like the pictures
[quote name='bbrock' date='Jan 19 2020, 01:04 PM' post='2778904']
It's nice to have little interludes mixed in . . . .
[quote name='bbrock' date='Jan 19 2020, 01:04 PM' post='2778904']
In fact, after I refurbished my gauges, I put the instrument cluster in our family room as a show piece for inspiration.
[/quote]
@bbrock
And to think I thought I was the only dork that did this. My wife banishes it to the man cave though!
[/quote]
That’s got a wife upstairs vibe all over it. I like the pictures
This is a "lo-fi" version of our main content. To view the full version with more information, formatting and images, please click here.